通知
プッシュ通知とアプリ内通知を構成します。
SDKに含まれているすべてのパブリックAPIは、Helpshift installWithPlatformId APIを介してSDKを初期化した後に呼び出す必要があります
次のような場合に、ユーザーに通知を送ることができます。
- あなたまたはサポートエージェントが、ユーザーから提出された問題に回答する場合
- ユーザーをターゲットにしたプロアクティブエンゲージメント通知を送信するとき
プッシュ通知を設定するには、Helpshiftの管理者ダッシュボードとクライアントアプリの両方を設定する必要があります。
Helpshiftの管理者ダッシュボードでプッシュ通知を設定する
Configure Helpshift's push notification service in the Helpshift admin interface
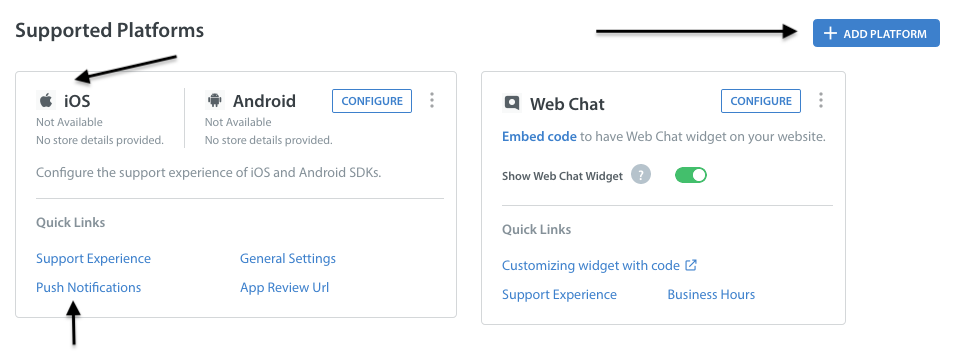
To enable the Helpshift system to send push notifications to your users you will have to add iOS as a platform in your app (if you have not added already). And then click on the push notifications option.
In order to send push notifications to all iOS mobile apps and games, you need to establish an authenticated connection with the Apple Push Notification Servers (APNs). There are two methods you can use to authenticate:
- The newer token-based method (.p8)
- The older certificate-based method (.p12)
Token-based method (.p8)
The token-based method is faster because it offers a stateless way to communicate with APNs. It doesn't require APNs to look up the certificate or any other information related to the provider server.
We now support the newer token-based .p8 key method, which allows you to send notifications to all your iOS apps and games using a single key. You can generate your .p8 key through your Apple developer account, as explained here.
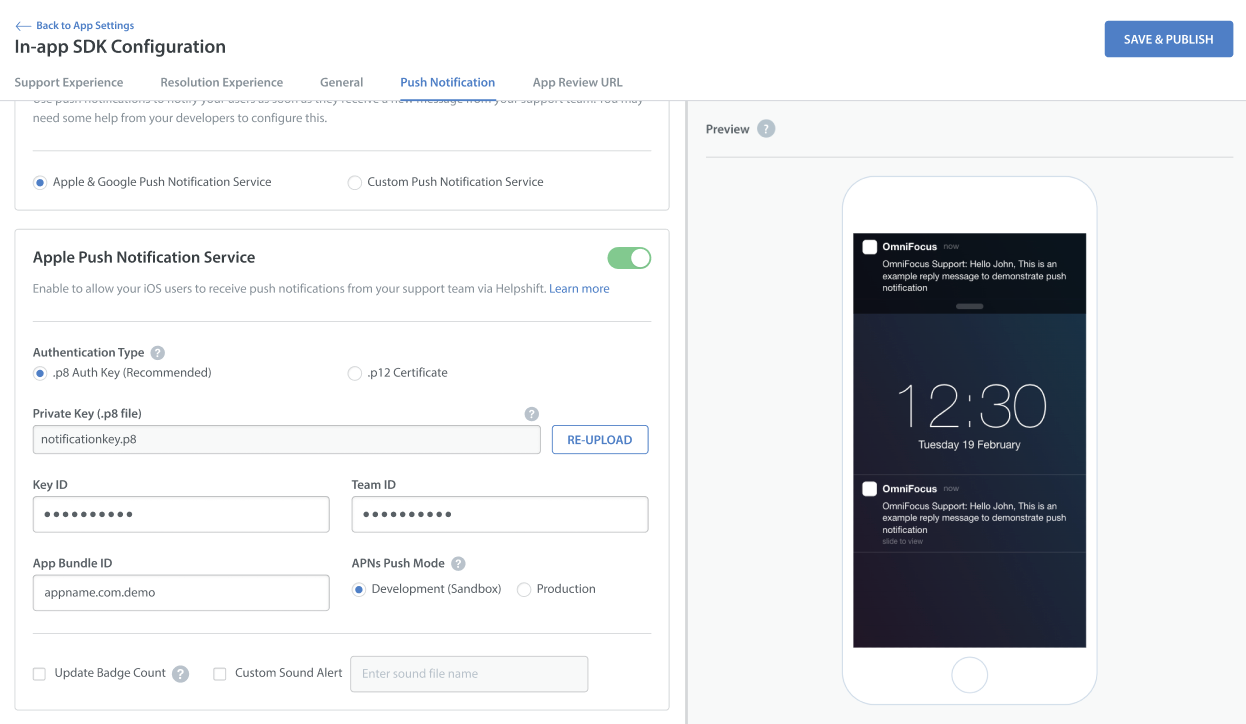
Here are the steps to configure iOS push notifications using .p8 keys:
Go to Settings, then navigate to the APP SETTINGS section to choose the app you want to configure.
On the App settings page, click on the CONFIGURE option next to In-app SDK.
On the In-app SDK Configuration page, navigate to the Push Notification section.
Enable the toggle for Apple Push Notification Service if not enabled. The app selects the p8 key authentication type by default when you enable the toggle for the first time.
Upload the p8 key and fill in all the required details.
Select the APNs push mode (Development/Production).
Click on Save & Publish to save the changes.
Certificate-based method (.p12)
You need to generate certificates for APNS on Apple's portal that you can later provide to Helpshift. This lets Helpshift send push notifications to your users. Apple has moved away from old type of certificates to Apple Push Notification service SSL. There is another option to create Apple Push Notification Authentication Key, but Helpshift does not support this option yet. It's also possible that you still have the old type of certificate that has not yet expired, this is also supported by Helpshift.
Apple provides two variations of Apple Push Notification service SSL
- Apple Push Notification service SSL (Sandbox)
- Apple Push Notification service SSL (Sandbox & Production)
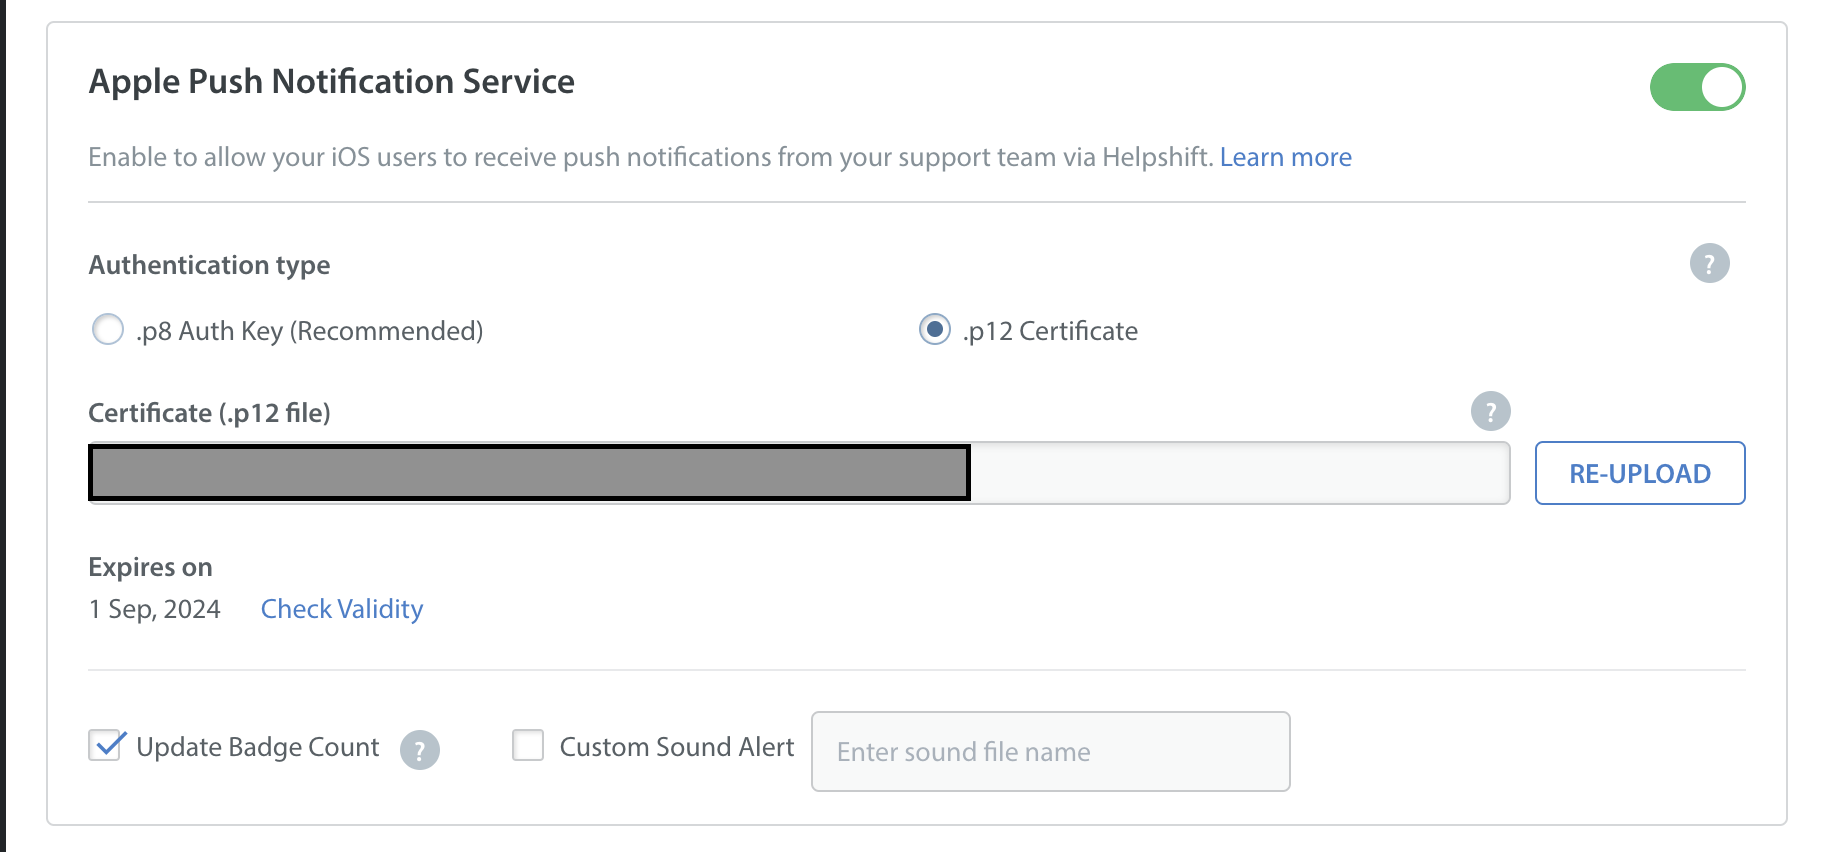
After creating your certificate, download it. Double click on it to import it to the Keychain Access application. In the Keychain Access application, right click on the certificate that was just added, and click export it in .p12 format. Please provide a password while exporting the certificate since we do not accept empty passwords. (Note that if your development private key is not present in Keychain Access, you will not be able to export it in .p12 format.)
After export, login and upload the .p12 file in your app in the Helpshift admin panel. Provide the same password you used while exporting to .p12 format.
Please note that you need to use the same bundle identifier in the app as the one you used to create the APNS certificate.
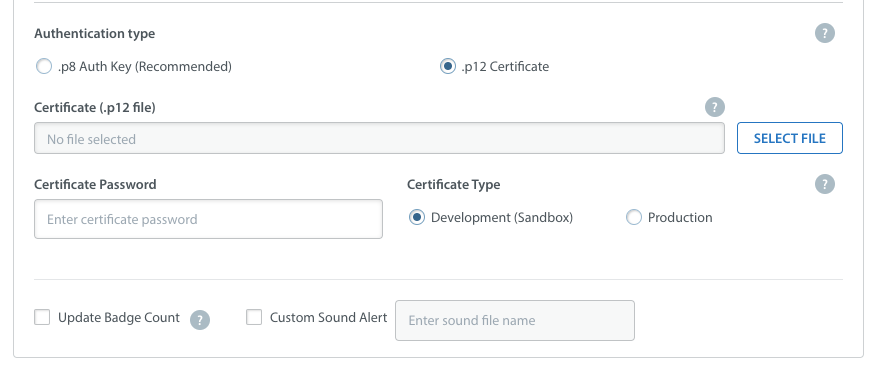
You can configure whether to send a badge or not, and sound alerts if you provided custom sounds bundled with your app to handle notifications. Save it and you're all set.
Development (Sandbox) mode vs. Production mode
When you build and run your app from Xcode, it is in development (Sandbox) mode. To test push notifications from Helpshift in this mode make sure you choose 'Development Mode' while uploading either of the above two certificate types.
When you publish your app and download from App Store, your app is in Production mode. To test push notifications from Helpshift in production mode make sure you choose 'Production Mode' while uploading a certificate of 'Apple Push Notification service SSL (Sandbox & Production)' type. Sandbox mode certificate will not work on a production environment.
We do not support using the same certificate for both sandbox and production apps. In these cases we recommend you create two separate apps on our dashboard, one in 'Production mode' and the other in 'Development mode'. While testing please use the credentials of the developement mode app. When you are ready to publish, please replace the credentials with those of the production level app.
Your Push Certificate has an expiry date, as indicated in the below screenshot. Helpshift will not send you a reminder when your Push Certificate expires, so please make sure that your developer keeps a tab on the expiry date to reupload the Push Certificate.
Helpshift iOS SDKが通知を処理するように構成する
プッシュ機能が構成されていない場合、Helpshift SDKはエージェント/ボットにより送信されたすべてのメッセージに対してすぐに使用可能なアプリ内通知を表示します。
registerDeviceToken APIを呼び出すのは、必ずHelpshiftダッシュボードをプッシュ通知用に構成した後にしてください。Helpshiftダッシュボードを構成せずにregisterDeviceToken APIを呼び出すと、エンドユーザーに対してアプリ内通知が表示されなくなります。
通知許可のリクエストとアプリのプッシュ登録
アプリでまだプッシュ機能を使用していない場合には、アプリのプッシュ機能を有効にする必要があります。アプリケーションでプッシュ通知を有効にするには、AppDelegateのapplication:didFinishLaunchingWithOptions:メソッドに通知許可リクエストおよびプッシュ登録コードを追加する必要があります。
- Objective-C
- Swift
- (BOOL) application:(UIApplication *)application didFinishLaunchingWithOptions:(NSDictionary *)launchOptions {
    UNUserNotificationCenter *center = [UNUserNotificationCenter currentNotificationCenter];
    center.delegate = self;
    [center requestAuthorizationWithOptions:(UNAuthorizationOptionBadge | UNAuthorizationOptionSound | UNAuthorizationOptionAlert)
                          completionHandler:^(BOOL granted, NSError *_Nullable error) {
        if(!granted) {
            NSLog(@"Notification auth denied");
        } else {
            NSLog(@"Notification auth granted");
            dispatch_async(dispatch_get_main_queue(), ^{
                [UIApplication.sharedApplication registerForRemoteNotifications];
            });
        }
    }];
}
func application(_ application: UIApplication,
                didFinishLaunchingWithOptions options: [UIApplication.LaunchOptionsKey : Any]? = nil) -> Bool {
    let center = UNUserNotificationCenter.current()
    center.delegate = self
    center.requestAuthorization(options: [.badge,.alert,.sound]) { granted, error in
        if granted {
            print("Notification auth granted")
            DispatchQueue.main.async {
                UIApplication.shared.registerForRemoteNotifications()
            }
        } else {
            print("Notification auth denied")
        }
    }
}
登録したプッシュトークンをHelpshiftに渡します。
Helpshift SDKをHelpshiftのプッシュ通知サービスと連携させるには、
registerDeviceToken: API呼び出しをアプリケーションのデリゲートメソッド
application:didRegisterForRemoteNotificationsWithDeviceToken:の内部で呼び出す必要があります。
アプリのデリゲートファイルでは、以下のようになります。
- Objective-C
- Swift
- (void) application:(UIApplication *)application didRegisterForRemoteNotificationsWithDeviceToken:(NSData *)deviceToken {
    [Helpshift registerDeviceToken:deviceToken];
}
func application(_ application: UIApplication, didRegisterForRemoteNotificationsWithDeviceToken deviceToken: Data) {
    Helpshift.registerDeviceToken(deviceToken)
}
プッシュデリゲートの実装
配信された通知に応答するには、共有されているUNUserNotificationCenterオブジェクトのためのデリゲートを実装する必要があります。デリゲートオブジェクトは、通知センターがアプリに通知情報を配信するために使用するUNUserNotificationCenterDelegateプロトコルに準拠する必要があります。
- アプリがフォアグラウンドにあるときに通知が届くと、UNUserNotificationCenterDelegateの
userNotificationCenter:willPresentNotification:withCompletionHandler:が呼び出されます。 - アプリがバックグラウンドにあるか、終了時に通知が届いた場合、システムは
userNotificationCenter:willPresentNotification:withCompletionHandler:メソッドを呼び出しません。代わりに、システムは通知そのものに含まれている情報に従ってユーザーにアラートを発します。 ユーザーが通知インターフェースからアクションを選択すると、システムはユーザーの選択をアプリに通知します。レスポンスを受け取るためには、デリゲートオブジェクトはuserNotificationCenter:didReceiveNotificationResponse:withCompletionHandler:メソッドを実装する必要があります。
どちらの場合も、通知辞書の「origin」フィールドをチェックし、originが「helpshift」であれば、対応するSDK API(後述)を呼び出す必要があります。Helpshift SDKは、ペイロードに応じて透過的に通知を処理します。
- ユーザーのサポート会話に対するエージェントの返信に応じて送信された通知の場合、SDKは対応する会話を開きます。
- プロアクティブエンゲージメント通知の場合、SDKはダッシュボードで設定されたアクションを実行します。
アプリがフォアグラウンドのときのプッシュデリゲート
userNotificationCenter:willPresentNotification:withCompletionHandler:デリゲートについては、handleForegroundNotification:withCompletionHandler: SDK API を呼び出してください。
- Objective-C
- Swift
- (void) userNotificationCenter:(UNUserNotificationCenter *)center
        willPresentNotification:(UNNotification *)notification
          withCompletionHandler:(void (^)(UNNotificationPresentationOptions)) completionHandler {
    NSDictionary *userInfo = notification.request.content.userInfo;
    if([@"helpshift" isEqualToString:userInfo[@"origin"]]) {
        [Helpshift handleForegroundNotification:userInfo withCompletionHandler:completionHandler];
    } else {
        completionHandler(UNNotificationPresentationOptionBanner |
                          UNNotificationPresentationOptionSound  |
                          UNNotificationPresentationOptionList);
    }
}
func userNotificationCenter(
    _ center: UNUserNotificationCenter,
    willPresent notification: UNNotification,
    withCompletionHandler completionHandler: @escaping (UNNotificationPresentationOptions) -> Void
) {
    let userInfo = notification.request.content.userInfo
    if let origin = userInfo["origin"] as? String, origin == "helpshift" {
        Helpshift.handleForegroundNotification(userInfo, withCompletionHandler: completionHandler)
    } else {
        completionHandler([.banner, .sound, .list])
    }
}
アプリがバックグラウンドにあるか実行中でないときのプッシュデリゲート
userNotificationCenter:didReceiveNotificationResponse:withCompletionHandlerデリゲートについては、handleBackgroundNotificationClick:withCompletionHandler: SDK API を呼び出してください。
userNotificationCenter(_:didReceive:withCompletionHandler:)
が提供する完了ハンドラーは、メインスレッドで呼び出す必要があります。
これをバックグラウンドのスレッドから呼び出すと、
NSInternalInconsistencyExceptionクラッシュが引き起こされる可能性があります。これは、アプリが
バックグラウンド状態やキル状態から起動された場合に特に顕著です。
- Objective-C
- Swift
- (void) userNotificationCenter:(UNUserNotificationCenter *)center
 didReceiveNotificationResponse:(UNNotificationResponse *)response
          withCompletionHandler:(void (^)(void))completionHandler {
    NSDictionary *userInfo = response.notification.request.content.userInfo;
    if([@"helpshift" isEqualToString:userInfo[@"origin"]]) {
        [Helpshift handleBackgroundNotificationClick:userInfo
                               withCompletionHandler:^{
            dispatch_async(dispatch_get_main_queue(), ^{
                completionHandler();
            });
        }];
    } else {
        completionHandler();
    }
}
func userNotificationCenter(
    _ center: UNUserNotificationCenter,
    didReceive response: UNNotificationResponse,
    withCompletionHandler completionHandler: @escaping () -> Void
) {
    let userInfo = response.notification.request.content.userInfo
    if let origin = userInfo["origin"] as? String, origin == "helpshift" {
        Helpshift.handleBackgroundNotificationClick(userInfo) {
            DispatchQueue.main.async {
                completionHandler()
            }
        }
    } else {
        completionHandler()
    }
}
NotificationService拡張機能の設定
アプリでNotificationService拡張機能を構成する必要があるのは、プロアクティブエンゲージメント機能を使用している場合だけです。サポート通知については、この設定を省略できます。
Helpshiftのプロアクティブエンゲージメント機能を使用している場合、アプリにNotificationService拡張機能を追加する必要があります。この拡張機能により、iOSシステムがシステムトレイに通知を表示する前に、アプリが通知を傍受し、ペイロードを変更できます。このサービス拡張の機能およびアプリでの設定方法の詳細については、Appleドキュメントを参照してください。
Helpshiftは、プッシュ通知に表示する画像をダウンロードするためにこの拡張機能を使用します。もしアプリにすでにNotificationService拡張機能があるならば、Helpshiftの通知処理に再利用できます。通知サービスのdidReceiveNotificationRequest:withContentHandler:メソッドで、対応する Helpshift API を呼び出します。
- Objective-C
- Swift
- (void) didReceiveNotificationRequest:(UNNotificationRequest *)request
                    withContentHandler:(void (^)(UNNotificationContent *content))contentHandler {
    NSString *origin = request.content.userInfo[@"origin"];
    if([@"helpshift" isEqualToString:origin]) {
        [Helpshift handleBackgroundNotification:request
                           withContentHandler:contentHandler];
    } else {
        contentHandler(request.content);
    }
}
override func didReceive(
    _ request: UNNotificationRequest,
    withContentHandler contentHandler: @escaping (UNNotificationContent) -> Void
) {
    let origin = request.content.userInfo["origin"] as? String
    if origin == "helpshift" {
        Helpshift.handleBackgroundNotification(request, withContentHandler: contentHandler)
    } else {
        contentHandler(request.content)
    }
}
アプリ内通知
アプリ内通知は、Appleのプッシュ通知バナーに似ています。プッシュ通知とは異なり、ユーザーの使用中にアプリ内に表示されます。これらの通知のUIは次のようになります。

これらの通知は、以下の場合に送信されます。 1.エージェントが顧客の問題に返信した時。顧客は、それらのバナーをクリックすることで直接会話画面に移動することができます。 2.ユーザーがアプリをアクティブに使用している間、アプリ内型のプロアクティブエンゲージメント通知を受け取ります。バナーをクリックすると、管理者ダッシュボードで設定した通知のアクションが実行されます。
アプリ内通知の有効化/無効化
このセクションは、アプリ内サポート通知のみに適用され、プロアクティブエンゲージメント通知には適用されません。
HelpshiftのインストールコールでenableInAppNotificationフラグを使用することで、アプリ内のサポート通知を有効/無効にできます。
| フラグ | enableInAppNotification |
| 値 | YES/NO |
| デフォルト | YES |
このフラグの既定値はYESです。そのため、アプリ内サポート通知は有効化されます。
例:
- Objective-C
- Swift
NSDictionary *config = @{ @"enableInAppNotification": @YES };
[Helpshift installWithPlatformId:@"YOUR_PLATFORM_ID"
                          domain:(NSString *)domain
                          config:@"YOUR_DOMAIN" config:config];
let config = ["enableInAppNotification" : true]
Helpshift.install(withPlatformId: "YOUR_PLATFORM_ID", domain: "YOUR_DOMAIN", config: config)
アプリ内通知の一時停止
pauseDisplayOfInAppNotificationAPIを使用して通知の一時停止や再開を行います。このメソッドにYESが渡されると、アプリ内通知が届いても表示は一時停止されます。NOを渡すと、アプリ内通知が表示されるようになります。アプリ内サポート通知を無効化している場合、このフラグはサポート通知には影響しません。アプリ内のプロアクティブエンゲージメント通知には機能します。
例:
- Objective-C
- Swift
[Helpshift pauseDisplayOfInAppNotification:YES]; // To temporarily pause in-app notifications
[Helpshift pauseDisplayOfInAppNotification:NO]; // To resume showing the in-app notifications
Helpshift.pauseDisplayOf(inAppNotification: true) // To temporarily pause in-app notifications
Helpshift.pauseDisplayOf(inAppNotification: false) // To resume showing the in-app notifications
通知バッジ
ユーザーが投稿した
問題に対する返信に関する通知を表示する場合、
Helpshift SDKが提供する通知カウント機能を使用することで未読メッセージの総数を取得し、バッジとして
表示することができます。.hファイルと.m
ファイルのそれぞれにHelpshiftDelegateを
実装することにより、通知数を非同期で取得することができます。通知は通常、ユーザーがヘルプセクションを呼び出した
アプリ内でバッジとして
表示されます。これらのバッジはアプリのインターフェースのあらゆる場所に表示することが可能であり、あなたからの
未読の返信やメッセージがあることをユーザーに伝えることができます。たとえば、
以下を使用して通知のポーリングを行っている間に、
ビュー(textLabelを設定できるyourViewとします)にバッジを表示します。
[Helpshift requestUnreadMessageCount:YES];
通知数デリゲートメソッドでは、以下のように実装することができます。
- Objective-C
- Swift
- (void) handleHelpshiftEvent:(NSString *)eventName withData:(NSDictionary *)data {
    ...
    if([eventName isEqualToString:HelpshiftEventNameReceivedUnreadMessageCount]) {
        int count = [data[HelpshiftEventDataUnreadMessageCount] intValue];
        BOOL fromCache = [data[HelpshiftEventDataUnreadMessageCountIsFromCache] boolValue];
        NSLog(@"Unread count: %d", count);
        NSLog(@"Is unreadCount served from local cache : %d", fromCache);

        dispatch_async(dispatch_get_main_queue(), ^{
            [yourView setTextLabel:[NSString stringWithFormat:@"%d",count];
        });
    }
}
func handleHelpshiftEvent(_ eventName: String, withData data: [AnyHashable : Any]?) {
    if eventName == HelpshiftEventNameReceivedUnreadMessageCount {
        guard let data = data else { return }
        let count = data[HelpshiftEventDataUnreadMessageCount] as? Int
        let isFromCache = data[HelpshiftEventDataUnreadMessageCountIsFromCache] as? Bool
        print("Count: \(count), fromCache: \(isFromCache)")

        DispatchQueue.main.async {
            yourLabel.text = "\(count)"
        }
    }
}
同様に、通知数デリゲートメソッドのUITabBarItemについては、以下のように
実装することができます。
- Objective-C
- Swift
- (void) handleHelpshiftEvent:(NSString *)eventName withData:(NSDictionary *)data {
    ...
    if([eventName isEqualToString:HelpshiftEventNameReceivedUnreadMessageCount]) {
        int count = [data[HelpshiftEventDataUnreadMessageCount] intValue];
        BOOL fromCache = [data[HelpshiftEventDataUnreadMessageCountIsFromCache] boolValue];
        NSLog(@"Unread count: %d", count);
        NSLog(@"Is unreadCount served from local cache : %d", fromCache);

        dispatch_async(dispatch_get_main_queue(), ^{
            tabBarItem.badgeValue = [NSString stringWithFormat:@"%d",count];
        });
    }
}
func handleHelpshiftEvent(_ eventName: String, withData data: [AnyHashable : Any]?) {
    if eventName == HelpshiftEventNameReceivedUnreadMessageCount {
        guard let data = data else { return }
        let count = data[HelpshiftEventDataUnreadMessageCount] as? Int
        let isFromCache = data[HelpshiftEventDataUnreadMessageCountIsFromCache] as? Bool
        print("Count: \(count), fromCache: \(isFromCache)")

        DispatchQueue.main.async {
            tabBarItem.badgeValue = "\(count)"
        }
    }
}
これらは、デリゲートメソッドに新しい通知
が届くたびにビューまたはUITabBarItemを更新します。状況は、
アプリのUIにより異なります。適切な場所に通知の数を表示することにより、ユーザーの注意を
引き付けてより積極的に会話
に参加してもらえるようになる可能性があります。ローカルに保存されている未読メッセージの通知
数をユーザーに対して表示するには、requestUnreadMessageCountを呼び出します。
- Objective-C
- Swift
[Helpshift requestUnreadMessageCount:NO]
Helpshift.requestUnreadMessageCount(false)
ローカルに保存されている未読メッセージの数を取得し、上記の例で説明されているものと同じように未読の数を表示します。
SDKがアプリに未読の数を通知する仕組みの詳細については、未読メッセージ数イベントをご参照ください。
バッジ数のリセット
アプリケーションアイコンでバッジのリセットを処理する必要がある場合は、
applicationDidBecomeActive:デリゲート
メソッドで以下のように処理します。
- (void)applicationDidBecomeActive:(UIApplication *)application
{
    [[UIApplication sharedApplication] setApplicationIconBadgeNumber:0];
}